Clock Movements FAQ
The simple answer is TIME. Even clocks are not immune to the passage of time. As the time goes by, the oil used in the mechanical clock movements solidifies and becomes dark and sticky. As 20 or 30 years go by, the pivot holes become oblong instead of round, the holes are pinching the pivots and creating resistance in the gear train. This is creating wear on the movement’s brass plates.With the solidified oil and the pinched pivots, the clock will eventually stop working or chiming. Yes, the clock movement can be taken apart and cleaned by a professional but the cost of getting a new movement is usually less than a cleaning, and it will last much much longer before you have to think about having your clock serviced again.The new movement will of course last a lot longer than any repair that can be done on the old unit.
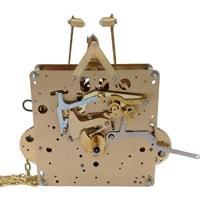
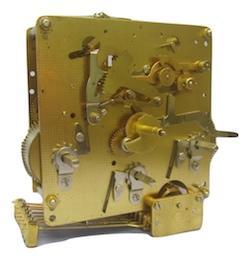
The numbers off of the back plate of the Hermle mechanical clock movement is all you need to know to find the correct movement and order it on our site. The first set of numbers (six or eight with a hyphen in the middle) tell us what type of the movement it is and any additional number identify the length of the gearing (pendulum).
Please note that Hermle clock movements often have the name of the clock case maker stamped onto the brass plate of the movement. Many popular clock manufacturers used Hermle or as they otherwise known FHS movements but stamped their own name on the movement. For example, Emperor, Howard Miller, Sligh, Ridgeway, Seth Thomas, Pearl, King Arthur, Webly and many other popular manufacturers used Hermle movements. However, the part number remained Hermle and you should be able to identify your movement and replace it.
Timely & Timeless offers genuine Hermle Replacement Mechanical Clock Movements, Kits, Parts and Accessories. Shop Mechanical Clock Movements by Hermle

Installing New Hermle or Urgos Mechanical Movement
Even though it is relatively easy to instal a replacement clock movement, unless you are confident that you are able to do it yourself, we recommend that you rely on a professional to do it for you. Clocks, particularly older clocks are too valuable to take any chances. We are however, would be very happy to help you identify the correct movement and to ship it to you as quickly as possible so that your clock is keeping perfect time in no time at all. Please contact us if you need any assistance.
All Clock movements sold by Timely & Timeless are covered by the manufacturer's warranty
- FHS and URGOS clock movements have a 3 year warranty against factory defects. Within 1-90 days: repair or replace at manufacturer's discretion and return is paid by the manufacturer.
- After the 91 days and up to 3 years: customer responsible for return. Manufacturer will repair defective unit including pivot holes worn to the point the clock stops.
- If any markings are added to the movement, this becomes an automatic repair.
- Contact us for a return number before shipping
- It is the responsibility of the customer to pack the return securely. Damages due to improper packing by the customer will not be credited.
There are the following enhanced warranties available:
- Bearings in the UW03 series have a 15 year warranty.
- The AEL12 and SEW01 have a 5 yr. warranty on the balance unit
Shop for Mechanical Clock Movements by Hermle with confidence

You can find instructions on how to install your new Hermle Quartz movement here![]()
and the diagram on installation here ![]()
Battery-operated, quartz dual chime Movements Troubleshooting
Old and exhausted batteries is the primary cause for the movement to malfunction while keeping time, playing a melody, or swinging the pendulum (on some models). Ensure that you are using brand new alkaline batteries and they are installed following the + and - symbols. Do not mix old and new batteries or alkaline and non-alkaline batteries.
A poor electrical connection on one or more batteries can also cause performance issues. Ensure that the batteries are fully inserted. Make certain that the + and - battery tabs are positioned completely on the circular metal contact area of the battery – not on the outer battery casing. As necessary, adjust the battery tabs to ensure they are making proper electrical contact with the circular metal contact area of the battery.
Other issues and possible remedies:
- Pendulum will not swing: To provide proper pendulum operation, it is necessary to ensure that the clock is level side-to-side and front-to-back. Also check that the pendulum is properly located on the pendulum hanger. Make certain the speaker wires in the closed door position do not interfere with the pendulum’s swinging motion. Replace with new batteries.
- Clock is slow: Make certain the hands do not rub on the dial or glass. Make certain the hour and minute hands don’t cross or touch. Carefully adjust hands as necessary. Replace with new batteries.
- Hour strike count does not match position of the hour hand: For example, the hands show 2:00 and the clock strikes 3 times at the top of the hour. With the minute hand at the 12:00 position, manually rotate the hour hand (not the minute hand) to the position to match the hour strike. In the example above, the hands show 2:00 and the clock strikes 3 times. We will manually move the hour hand to 3 and then use the hand set knob on the back of the movement to set the correct time.
- Chime volume is off or lower during the day and louder at other times: The nighttime volume reduction or shut-off is not properly set. Reset the nighttime shut-off. Replace with new batteries.
- Chime volume is always low: Make certain the speaker is not covered. Attempt to increase volume using the volume control knob. Replace with new batteries.
- Chime is off – will not chime: Ensure that the chime is not in the “OFF” position. Replace with new batteries.
- The clock chimes several minutes before the hour when the hands are moved manually:This is normal. The clock will chime on the hour under normal operation.
NOTE: Gears in battery-operated movements can not be replaced or repaired, so if new batteries or the troubleshooting suggestions above do not fix the problem, the movement will need to be replaced.
ROCKLER HERMLE MOVEMENT INSTRUCTIONS
PARTS LIST
QTY. PART DESCRIPTION
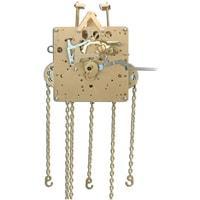
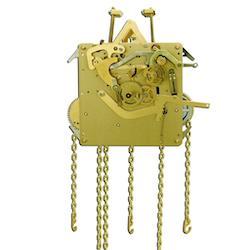
- Movement #451-050 (with chains, hooks, rings and hand nut )
- Weight shells - polished brass (40 x 232mm)
- Weight inserts - lead (4.7 lb.)
- Weight insert - lead (6.6 lb.)
- Pendulum -( Wood stick or Lyra style) depends on order
- Mounting screws & Washers (for seatboard mounting)
- Weight rods, hooks, knobs
- Chime block (back mount.) with mounting screws & washers
- Hands for 8” dial (pair)
- Chime selector angles with set screw
NOTE: HERMLE DOUBLE-CHECKS ALL PARTS PRIOR TO SHIPMENT.
Please read the instructions carefully before beginning to install your movement.
UNPACKING INSTRUCTIONS
- Keep movement wrapped and away from woodworking areas( dust can be harmful)
- Be sure to look through all packing material, not to miss any parts.
- Be careful cuting taped packed parts open.(You do not want to scratch or cut any parts)
MOUNTING MOVEMENT TO SEATBOARD
- Seatboard schematics should be provided with case plans.
- To fasten movement to seatboard you must first slip movement chains through the precut chain slot in seatboard, this will allow the movt. to rest level on the board. Place the movement onto the seatboard parallel to the front edge and center it from side to side. All chains must hang through the center slot of seatboard. Also, check that the pendulum leader does not come in contact with the seatboard after the movement is placed on it.
- Take the two movement mounting screws and washers, screw them in from underneath the seatboard into the bottom movement pillars with threaded holes. (These pillars are located in-between the movement plates at the bottom right & left corners of the movement.
- Make sure both screws are tightened so that the movement is secured to the seatboard and will not slide or tip when moved (finger tight plus one turn, do not over tighten).
MOUNTING DIAL TO MOVEMENT
- With the movement placed inside the clock, slide the selector angle onto the selector arm but do not tighten the set screw yet (angle points forward to protrude through dial slot).
- Slide the moon drive-gear onto the handshaft (with the teeth towards the movement).
- Take dial out of the plastic cover, fit dial onto the movement by inserting dial posts through the four holes in movement plate (holes are located at each corner of front movement plate).
- While holding dial on movement, you will notice that the four dial posts are protruding through the inside of the front plate. At the end of these posts there are holes drilled through them for the brass tapered pins. Press one tapered pin in each hole. (Be sure pin is in tight) This will hold dial in place.
- Align the moon drive-gear ,( you placed it on the handshaft in step 2) so it rides in the middle of the gear on bottom of the dial. Once it is in this position you can tighten the set screw in the moon drive-gear.
- Align the chime-selector angle protruding through the dial at the 3 o’clock position to the center of the slots in the dial and tighten the set screw. (Set screw is located on the back of the chime-selector angle).
- If you have the second hand option on your model, take the second-hand and insert its shaft through the hole of the second-hand dial. Make sure the second-hand does not come in contact with the dial. (not all models have the second hand option)
- Minute and hour hand installation comes after weight installation.
MOUNTING MOVEMENT TO CASE
- Install the movement which is mounted on the seatboard into the case. The handshaft has to be in the center of the case. The dial has to fit in the dial-cutout of the case. Make sure that the handshaft does not come into contact with the glass in the door when it is closed.
- Position the chime rod assembly inside the rear of the case such that the base of the chime block is approximately 1” above the hammers. Secure the seatboard at this time to the 2 mounting blocks inside the case with wood screws (not supplied by us).
- If your case is deeper than 9”, a wood block will have to be added to the back wall of the case to bring the chime block closer to the movement. The hammer wires on the movement must be bent to adjust to the chime block rods.
NOTE: None of the chime rods are to interfere with the pendulum leader or the pendulum itself .
- Mark the position of the four threaded holes onto the back board.
- Remove the chime assembly unscrew movement from seatboard and drill these four holes into the backboard using a 7/32” drill bit.
- Place the four washers onto the four mounting screws and secure the chime assembly to the case.
- Screw movement back onto the seatboard making sure that it is centered again. Also, make sure that the center shaft will not come into contact with the door when it is closed.(Important)
- With the movement secured, bend hammer arms so that the hammers strike each chime rod squarely in the center and rest approximately 1/16” to 1/8” off of the rods(you must do this to get the best sound. Also, do not position hammer arms closer than 1/16" because hammer will double hit the chime rod.) The closer the hammer is to the rod, the louder it will strike, the further away, the softer it will strike. Beyond this, there is no volume adjustment.
- Rotate the chrome chime hammer retainer bars back and away from the chime hammers. Make sure they are as far away as possible from the hammers.
INSTALLATION OF THE PENDULUM
- Unpack pendulum carefully.
- Use gloves to handle the pendulum, thus avoiding fingerprints. Hang the pendulum onto the pendulum hanger hook , located on the back side of the movement.
INSTALLATION OF THE WEIGHTS
- Unpack the three weights also using gloves to avoid fingerprints.
- Using a clean cloth rag or glove to hold weight shells, insert one weight insert into each of the brass weight shells. Some inserts may fit tightly, so some force may be necessary. Be careful not to dent or scratch shells.
- Insert the 6.6 lb. weight into one shell. Insert the 4.7 lb. weights into the other shells, Place an end cap onto each end of all the weights.
- Next slide the weight rod through the entire weight insert and shell so the rod protrudes through the top and bottom of the shell. Then screw one hook on the top and one knob on the bottom of all three shells.
- Take the 6.6 lb. weight and hang it on the right-hand chain (chime side) while making sure that the chain lies hooked on the gear above. Install the other two weights in the same manner. (If you have two heavy weights and one light, then the two heavy weights should be hung on the middle & the right side chain. (This is looking at the clock from the front.)
IMPORTANT: The weights and pendulum MUST be removed before moving your clock. Failure to do so may damage the pendulum, weights, your case or break the door glass.
You can find downloadable instructions on how to install your new 451 Series Movement here![]()
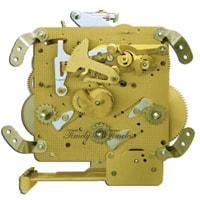
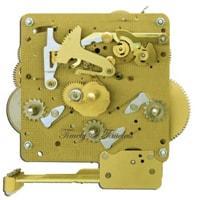
HERMLE MOVEMENTS

NOTE: TIME WEIGHTS SHOWN ARE FOR WOOD STICK. FOR LYRE PENDULUM, TIME WEIGHT IS THE SAME AS THE CHIME WEIGHT
KIENINGER MOVEMENTS

URGOS MOVEMENTS