Cuckoo Clocks: Instructions, Manuals and Troubleshooting.

1. After removing the clock from the box, unpack each of the items carefully. For now, leave the chains on the bottom of the clock wrapped. Be sure to unwrap each of the other paper bundles as there may be tiny pieces inside. If you have a traditional carved hunting model your box will include the following: clock, top piece, deer head, antlers (left and right), horn bell, pendulum, and either two or three heavy weights. If you have a chalet cuckoo clock, your clock will not include a top piece.
2. If your clock has a deer head with antlers, you may assemble that first. Use the screw included to attach the deer head to the shield. Drive the screw through the hole in the shield and into the back of the head were a hole has been started. Push the antlers into the holes at the top of the head so that they curve up and away from the front and center of the clock.
3. Slide the top piece onto the clock. The top should have two bent pins which correspond to two holes in the roof of the clock. Slide these pins into the holes. You may have to turn the pins so they are perpendicular to the holes. Rather than pins, some clocks have screws which slide into saddles thereby holding the top in place. Some high-end cuckoo clocks have top pieces that attach with small screws. There should already be holes drilled in the top to receive these screws. Be careful not to over-tighten these screws. They should be just tight enough to hold the top piece in place. A fourth method of attaching the top piece also exists: the clips. These are very simple. Simply make sure there is enough tension on these clips and slide them over the edge of the cuckoo roof.
4. If you have a horn bell, push it into the hole near the dial. There may be other little decorative pieces on your clock. Simply slide these pieces over their corresponding pegs. Take a look at the picture on our website and compare your clock. Many clocks have a few decorative pieces which fit on in various ways. If the method of fitting these pieces isn’t completely obvious, please don’t hesitate to contact your dealer for help.
5. Open the back of the clock. There are two wire clips around the bellows. (figure 1) Remove them as well as the paper strip on the coiled gong. (figure 2 Make sure the wire with the loop on the end falls through the slot on the bottom of the clock. (figure 3 and 6) Replace the back of the clock. Fit the bottom edge of the back piece into the groove at the bottom of the clock first, then close the top edge.
6. Hang the clock on the wall. It is best to find a stud to support the weight. Drive a good sized screw in at an angle. (figure 4) To get the full 24 hours, or 8 days out of a single wind, hang the clock about 7 feet from the floor. How high you hang the clock determines how long it will run on a single wind. You may hang the clock as low as you like, but you may have to wind it more often as a result.

1. Untie the wire at the bottom of the clock and remove the wrapping and wire from the chains (figure 8) The chains should fall free to the floor. Do not turn the clock upside down after removing this wrapping. See that the chain is free of knots and hanging freely.
2. There is a wire on the front of the clock holding the cuckoo’s door closed. Turn that wire to the side, unlocking the door. (figure 5)
3. Hang the heavy weights (pine cones) on the brass hooks and the wooden pendulum on the wire loop hanging through the slot (figure 6). The clock may start to cuckoo. It will adjust itself after the first hour and call the correct hour after that.

To set the time turn the minute hand backwards (counter-clockwise) until the clock shows the correct time. Do not move the smaller (hour hand). After the first hour the cuckoo should call the correct time.If you move the minute hand clockwise you must wait each time for it to finish its call and music before you continue.
After setting the clocks hands make sure the cuckoo shut off switch is to the ON position. (figure 7)
To wind the clock pull the chain without the weight hanging on it (the end with the brass ring) directly towards the floor. Do not help the weight up by touching it or lifting it.
To regulate the time: If the clock is running fast, gently slide the pendulum leaf or disc downwards. LOWER IS SLOWER. If the clock is running slowly, gently slide the pendulum leaf or disc upwards.
How to Set Your Quartz Cuckoo Clock
There have been some changes to the quartz cuckoo clock movements. The new models don't have the cumbersome "eye" or light sensor, but rather a more sophisticated night-off system. The newer clocks also have nicer music!
In order to properly set up your new quartz cuckoo clock, there are a few things to take note of. The proper set-up procedure is already in your printed instructions, and here, but please also reference this article to troubleshoot.
The point of the setup procedure is to FIRST properly align the chiming computer mechanism with the clock hands, and SECOND to set the correct time on your clock hands. In order to do this, you'll need to find out what time your bird thinks it is. Once you have the batteries installed, move the longer minute hand only (don't touch the shorter hour hand) clockwise until the hour is reached. Please make sure you have the cuckoo switched on before taking this step.
Once the hour is reached, count the number of times the cuckoo calls. Keep in mind, that each cuckoo call is followed by an echo - in other words: you should only count the first LOUDER "cuckoo" of each set. The softer echo call is not meant to be counted.
If you did not hear any cuckoo call, you are probably in the nighttime or PM setting. Keep going around with the minute hand until the cuckoo will call again. You need to get back on to the AM setting so that you can hear the bird.
Once you have counted the amount of calls, compare it to what the hands say. If, for example, the clock cuckooed 9 times and the hands show 7:00 you'll need to push the setting button twice to realign the movement with the hands. If your clock is calling 11 times and your hands show 6:00, then press the button once (7:00) twice (8:00) three times (9:00) four times (10:00) and finally five times to reset the computer to synchronize the chime with the hands. In other words you'll have to tell the computer to catch up to the hands.
If your clock calls 6 times, and your hands show 5:00, you'll need to push the button 11 times.
An alternative method of aligning the computer with the hands would be to simply move the hour (shorter) hand independently to match the number of calls counted. This is the same procedure used on mechanical clocks.
Remember, you can only make this synchronization when the clock is in the daytime hours. If, at any time during this phase of the setup your clock does not make any cuckoo calls DON'T PANIC. You are probably in the PM time range, and will simply have to advance the minute hand a few hours so that the clock will cuckoo again.
Once your computer and hands are synced up, you can set the time as usual. Simply move the minute hand around until the correct time is reached. NOTE: You don't have to wait at each hour for the music to finish. Once the bird and hands are synchronized, they will remember where the hands are pointing.
You will probably have to realign using this simple procedure every time you change the batteries.
A note on Our NEW Sternreiter quartz cuckoo Model 40QM:
This clock has a more sophisticated mechanism with an automatic night shut-off. The older models had a light sensor switch, but the new models actually have a timing device which shuts off the cuckoo and the music during the nighttime hours. In order for it to function properly, the clock must be sequenced to the proper day/night setting. In order to do that properly, follow this sequence:
BEFORE INSTALLING THE BATTERIES
1. Turn the minute hand clockwise until it points to 5:00am
2. Open the back cover and insert 3 batteries R14 in the battery holder (for best results, use Duracell or a generic brand - any brand OTHER than Energizer.)
3. From 6:00am to 9:00pm, the cuckoo will call the full hour on the hour. From 10:00pm to 5:00am the night shut-off should be in effect and the cuckoo will not call.
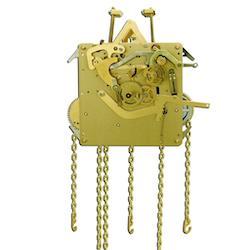
Clock movements are really very simple, when you compare them to electronics. Brass clock movements are generally not influenced by all but the most extreme static electricity, temperature fluctuations, humidity changes, or magnetic fields. Once all of a clock movement's wheels have turned 1 revolution, there is no reason why they shouldn't keep making those revolutions for at least 2 years time without service unless some physical change has come to them.
Unless it has been moved or jostled there is no reason to expect that any modern mechanical clock should develop any new problem after a week's worth of good running. If your clock stopped working properly "out of the clear blue sky," take a moment to double check the following:
1. "Is the clock hanging straight?"
Forget about how straight the clock looks on the wall. Use your ears. You should be listening for an even TICK TOCK (listen) sound. If you hear an uneven tick TOCK or TOCK tick (listen) sound, carefully tilt the clock one direction or the other. You can carefully move the bottom of the hanging clock to the right or to the left until you hear that even ticking sound.
2. Flat against the wall.
Make sure that your clock is hanging flat against the wall. There should be no space between the back of the clock and the wall. The clock needs to be hanging exactly parallellel to the wall.
3. Wind the clock fully.
Many times, clock owners will be afraid of winding a spring-wound clock too tightly. Don't be. You can't break the spring. Most mainsprings are about an inch-wide ribbon of tempered steel. Could you imagine breaking this with your own arm... by twisting it?? These springs will break under the stress of age, nothing more. Besides, there is a stop catch built into new mechanisms to provide safety. Wind the clock until it comes to a complete stop. If you have a key, wind it until it goes no further. If there are weights, wind the clock until the weight comes all the way to the top. DO NOT LIFT the weight with your other hand. There should always be tension on the chain or cable which supports the weight. The cable won't break, you don't need to "help" it.
4. Shut-off switch
Check the shut-off switch and don't trust the markings that label that switch. Sometimes they can be confusing. If your clock is not cuckooing, try the shut-off switch in both positions regardless of what the marker says.
5. Where are your weights?
Make sure the weights are each hanging on the hooks correctly.
6. The cuckoo door
There is a little wire latch which sometimes gets in the way of the cuckoo door. Make sure that this is out of the way so that the door can open.
Please review the great advise provided by Dolf Kämper of Sternreiter Clocks, one of Timely & Timeless most popular choices for Black Forest Cuckoo Clocks
Probably the most common error made during the setting of a clock that makes noise is that of moving the hour hand independently of the minute hand. Remember: when you set a clock, just move the (longer) minute hand and let the hour hand follow along. Many modern clocks allow you to move the minute hand backwards (counter-clockwise) some allow you to shut off the sounds so that you don't have to listen at each interval. Either way, you shouldn't move the hour hand independently of the minute hand - because you will cause your mechanism to become out of sync with your hands.
But, even if your hour hand does get moved, DON'T PANIC. Most modern clocks allow for an easy fix. Simply follow this procedure:
1. Move your (longer) minute hand clockwise to the hour. NOTE: if you have a quarter-hour or half-hour chime clock, you may have to wait at the quarter or half-hours for your clock to finish making its sounds.
2. Count the number of strikes or calls your clock gives at the hour.
3. Move your (shorter) hour hand, just this once, to the number called. This will get your clock back in sync with what the hands say.
4. Once your clock is back in sync, proceed to set your clock to the proper time - but don't move the hour hand this time! Just move the (longer) minute hand to the correct time and the hour hand will follow along. You may have to go around several hours to be in the correct day or night time to align with your calendar or shut-off mechanisms.
Just remember, that your clock mechanism doesn't know or care what the hands say. You will have to align the hands with whatever time the mechanism "thinks" it happens to be. Once you are locked in, you can move the minute hand to the proper time. The hour hand and clock mechanism will dutifully follow along with your direction.
NOTE: the above procedure is virtually universal for all clocks, but there are always exceptions. Ideally, when moving the hour hand, you should be able to slightly loosen the (shorter) hour hand from its shaft. Most are only fit on by friction, so you can press it back on in the correct setting very easily. If you have a clock where it is very difficult to move the hour hand independently, or if you cannot easily loosen it from a friction fitting, STOP. You should have a clock professional look at your clock.
Some antique clocks (like 18th Century tall case clocks, or skeleton clocks) actually have the hour hand screwed directly into the movement. If you force clocks with stiff hour hands you could cause serious damage to the mechanism. The procedure in this article is meant for most modern clocks.
Sometimes my cuckoo doesn't cuckoo at all, or at least not when it should.
A: Your clock is probably in the nighttime range. These clocks are meant to be silent between approximately 10pm and 8 or 9am. Simply move your minute hand (so that the hour hand follows) clockwise several hours until your clock starts cuckooing again. Now you are in the daytime range.
My cuckoo clock is cuckooing way too many times. Sometimes it cuckoos 15 times!
A: Remember that your quartz cuckoo has an echo. There are other sounds playing too, for example there is another kind of bird that starts the hour chime, then the cuckoo, his echo, and music. Be sure to only count the louder cuckoo calls - without their echos.
My quartz cuckoo clock isn't cuckooing the correct number of times. How do I sync the bird with the hands?
A: There are two methods for this. You could press the setting button a number of times equaling the difference between what the hands show and what the bird is calling. Count the number of calls first, then push the button to bring it up to what the hands say. You could also move the hour hand (independently of the minute hand) to match the number of calls the bird makes.
Please enjoy these instructional videos put together by Dolf Kamper of Sternreiter Clocks. Dolf is also a NA rep for Romba and other famous Black Forest Cuckoo Clock manufactures and he stocks most of the cuckoo clocks we offer for sale on this site.
.
The cuckoo clock carton contains the clock, top carvings and any other top attachments such as antlers and deer (in case of a carved cuckoo clock), the pendulum and the weights. Music clocks have three weights and clocks without music have two.
- Carefully remove the cuckoo clock from the carton by holding the clock frame. Do not pull the figurines or any other decorative attachment.
- Open the latches on the back panel.
- Remove the back panel of the cuckoo clock.
- Now, pull out the wire clamps that are securing the two bellows. Do not bend any of the wire connections. This might cause damage to the clockwork.
- Remove the cardboard under the strike gong of the cuckoo clock.
- Check if the extension of the pendulum is going through the slot at the base of the cuckoo clock
- Put the back panel back on and close the latches.
- Choose a place to hang your cuckoo clock. Hanging a clock by anchoring it directly into a stud is the best and most secure way to mount your cuckoo clock It is generally recommended that you use a screw with a minimum of 2 inches in length for going through the drywall and into a stud. Be sure to leave a 1/2 inch or more exposed outside the wall so the screw will fit firmly into the mounting hole on the back of the clock. It is also recommended that the screw have a large head and be installed at a slight downward angle as shown below. This is the most secure way to hang your cuckoo clock. Please note that a cuckoo clock, because of the chains, needs to hang 1,8 -2,0 meters (6-7 feet) above the floor. This height is necessary to give maximum extension to the chains.
- Unwrap the chain retaining wire at the bottom of the cuckoo clock and let the chains fall toward the floor. Remove any knots from the chains and pull out the retaining wire totally.
- Hang the pendulum onto the wire loop (11 a). and hang the weights onto the weight hooks.
- Start the clock by pulling the pendulum to one side and then releasing it to swing. Adjust the clock on the wall to achieve an even tick tock. To achieve an even tick tock move the case carefully from side to side (ie level horizontally) until it has an even sound. (Very important: do not turn the cuckoo clock upside down at any time after removing the retaining wire)
- The clock is set to 12 o’clock noon. For setting the correct time turn the minute hand (long hand) slowly forward or backwards until the hour and minute hand show the correct time. Never turn the hour hand.
- If the clock is not keeping good time then this can be corrected by moving the pendulum bob up to make the cuckoo clock run faster or down in order to make it run slower. Some cuckoo clocks have an adjusting screw instead which moves the bob up and down. Moving the bob has approximately the following effect: + or – 2 mm = + or – 10 Min. a day.
- Now you can fully wind up your clock. If you have a 1-day clock, pull each chain down slowly to raise the weight. When winding up an 8-day clock support the weight with your hand while pulling up. Always pull the chains, never the weights of your cuckoo clock. Pulling the weights can result in severe damage to the pulleys
- If you have purchased a cuckoo clock with manual or automatic night shut off for strike, cuckoo call and music then you will find the operation lever on the left side of the cuckoo clock or below the clock case
- Cuckoo clocks with manual night shut off have 2 options. Position I is off and position III is on.
- Cuckoo clocks with automatic night shut off have 3 options. Position I is permanently on, Position 2 is automatic night shut off from 09:00 PM till 08:00 AM and Position 3 is permanently off.
- Please use a soft dry paint brush to clean the clock. Please check and oil the movement at regular intervals. Temperatures below 5° C (40° F), high humidity and dust may damage your cuckoo clock. Please do not hang the cuckoo clock above a heater or above a fire place as the very dry and warm air might distort the wooden parts and dry out the oil in the bearings of the clock movement. Please also note that some 8 day clocks may run inaccurate if the are placed near a draft