Hermle Clocks: Operational Manuals
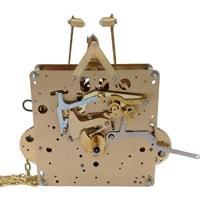
Operating Instructions for Hermle Mechanical Mantel and Table clocks with Hour and Half Hour Strike
note: These clocks have a blance wheel and Hermle 130 Series Movement
- Take the clock and key carefully out of the carton.
- Carefully remove the protective packaging such as foam rubber, corrugated paper, rubber bands, etc. You will find these mainly where the hammers, gongs or bells are located, inside the back of the clock. Open front door and remove the plastic safety bushing. Save the packing in case the clock needs to be returned.
- Please wind your clock fully every 7 days for optimum performance (the clock will actually run about 8 - 9 days on one winding). To wind the clock use the enclosed key. Turn key clockwise until it stops. The left winder is for the striking and the right winder is for the time.
- If striking is not required, do not wind up the left winding square (some models have a strike shutoff lever located inside the back of the clock).
- Move the minute hand (long hand) clockwise or counterclockwise to set the clock to the correct time. The clock will strike the number of each hour, and will strike once on the half-hour.
- If the clock is striking the wrong hour, move the hour hand (short hand) to point to the hour that the clock just struck.
- To make the clock go slower or faster, turn the regulating screw that is shown in the upper left of the picture below.To make clock go faster: turn screw at the very top left clockwise. To make clock go slower: turn screw counterclockwise. The screw is turned with a screwdriver. Make only a small adjustment each time (about 1/16 of a turn).

Instructions for Hermle Mechanical Mantel Clock with and hour and half hour strike and a pendulum
note: these clocks usually have Hermle 131 Series Movement
- Take the clock, pendulum and key carefully out of the carton. Carefully remove the protective packaging such as foam rubber, corrugated paper, rubber bands, etc. You will find these mainly where the hammers, the pendulum leader, gongs or bells are located, inside the back of the clock. Please wind your clock fully every 7 days for optimum performance (the clock will actually run about 8 - 9 days on one winding). To wind the clock use the enclosed key. Turn key clockwise until it stops. The left winder is for the striking and the right winder is for the time. Hang the pendulum onto the pendulum leader as shown in the diagram below. Move the pendulum slightly to the left or right and release it gently. You should hear an even "tic - toc" sound. If the tic-toc is uneven or the clock stops, follow the "putting in beat" instructions that follow next.
- Putting the clock in beat is an adjustment to make the tic and toc evenly spaced. There is a slip clutch mechanism in the clock's escapement (the part that makes the ticking sound and operates the pendulum). The slip clutch is operated by pushing the pendulum leader (see illustration 1) slightly past the point where you feel a resistance.
- Putting the clock in beat is the responsibility of the clock owner. While the clock was in beat when it left the factory, it may get out of beat due to handling or not being on a level surface.
- To put the clock in beat: Listen to the tic toc. Gently push the pendulum leader slightly past the point of resistance. Listen to the tic toc again. If it is more uneven, push the leader in the opposite direction and listen to the tic tock again. After several tries, you will be able to get the tic and toc sound to be evenly spaced, and the clock is then "in beat".
- If striking is not required, do not wind up the left winding hole.
- Move the minute hand (long hand) clockwise or counterclockwise to set the clock to the correct time. The clock will strike the number of each hour, and will strike once on the half-hour.
- If the clock is striking the wrong hour, move the hour hand (short hand) to point to the hour that the clock just struck. To make the clock run slower - turn the regulating nut below the pendulum to the left .To make the clock run faster - turn the regulating nut to the right. One turn of the regulating nut changes the clock's rate by approximately 1 minute per day. It is normal for the clock to be off 2-5 minutes a week.


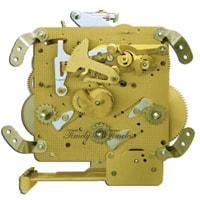
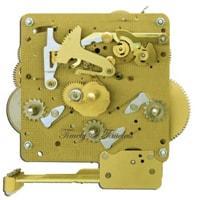
Operating Instructions for Hermle Mantel Clocks with Mechanical 4/4 Westminster Chime W0340 or 4/4 Triple Chime Movement
note: Westminster Chime Clocks have Hermle 340 Series Movement and Hermle Triple Chime Clocks have a 1050 Series Movement
- Take clock and key carefully out of carton.
- Open the back door. Remove carefully all packaging material and securing devices such as rubber, foam, paper, etc. Please cut rubber band with a pair of scissors. Open front door and remove the plastic safety bushing (see picture 2). Save the packing in case the clock needs to be returned.
- Please wind your clock fully every 7 days for optimum performance (the clock will actually run about 8 - 9 days on one winding). To wind the clock use the enclosed key. Turn key clockwise until it stops (about 3 1/2 turns on the left winder and about 4 1/2 turns on center and right winder. The center winder is for the timekeeping, the right winder is for the quarter-hour chime, and the left winder is for the hour strike.
- If you have a Westminster Chime Clock, the chime shut-off is located inside the back of the clock case at the right side of the movement (see photo 1)
 with a red plastic bushing. Lever up = chime ; Lever down = silent
If you have a Triple Chime Clock, the melody can be selected by the shift lever shown in picture 2. Never move the shift lever while the clock is chiming! The chime is off if you push the shift lever to the silent (top) position.
- The minute hand (long hand) may be moved clockwise or counterclockwise to set the clock to the correct time. Never turn the hour (short) hand, it moves automatically. After two hours the chimes will be automatically synchronized.
- To make the clock go slower or faster, turn the regulating screw that is shown in the upper right of picture 3.To make clock go faster: turn screw counterclockwise

- Take clock, the pendulum and key carefully out of carton.
- Open door of the clock's case. Carefully remove the protective packaging such as foam rubber, corrugated paper, rubber bands, etc. You will find the material where the hammers are, underneath the movement as well as at the end of the pendulum leader and around the chime rods. Save the packing in case the clock needs to be returned.
- Hang up the clock so that it is vertical. The safest way to hang the clock is a wood screw angled upward and screwed into a stud in the wall.
- Please wind your clock fully every 7 days for optimum performance (the clock will actually run about 8 - 9 days on one winding). To wind the clock use the enclosed key. Turn key clockwise until it stops (about 3 1/2 turns on the left winder and about 4 1/2 turns on center and right winder. The center winder is for the timekeeping, the right winder is for the quarter-hour chime, and the left winder is for the hour strike.
- Hang the pendulum onto the pendulum leader (see image below)
- Move the pendulum slightly to the left or right and release it gently. You should hear an even "tic - toc" sound. If the tic-toc is uneven or the clock stops, follow the "putting in beat" procedure.
- Putting the clock in beat is the responsibility of the clock owner. While the clock was in beat when it left the factory, it may get out of beat during handling. To put the clock in beat: Make sure the clock is hanging straight. Listen to the tic toc. Gently push the pendulum leader slightly past the point of resistance. Listen to the tic toc again. If it is more uneven, push the leader in the opposite direction and listen to the tic tock again. After several tries, you will be able to get the tic and toc sound to be evenly spaced, and the clock is then "in beat".
- The chime shut-off lever is located to the left of the numeral 9. Turn the lever down if you want the clock to be silent
- The minute hand (long hand) may be moved clockwise or counterclockwise to set the clock to the correct time. Never turn the hour (short) hand, it moves automatically. After two hours the chimes will be automatically synchronized.
- If the clock is striking the wrong hour, move the hour hand (short hand) to point to the hour that the clock just struck.
- To make the clock run slower - turn the regulating nut below the pendulum to the left
- To make the clock run faster - turn the regulating nut to the right.
- One turn of the regulating nut changes the clock's rate by approximately 1 minute per day. It is normal for a clock to run a few minutes fast or slow per week.
Ship's bell strike is based on "watches" onboard ship of 4 hours each. A new watch starts at noon, 4 p.m., 8 p.m., midnight, 4 a.m. and 8 a.m. The end of a "watch" and start of a new watch is marked by the bell being struck 8 times. A half hour later, the bell is struck once, with an additional strike each half hour until the end of the watch. Then the cycle starts again. The bells are struck in pairs, that is, the first two bells are struck close together followed by a pause, then the next two, etc. The table below shows the pattern of the bells.
| Time | Number of Bells Struck |
Pattern of Bells | ||
| 4:00 | 8:00 | 12:00 | 8 Bells | xx xx xx xx |
| 4:30 | 8:30 | 12:30 | 1 Bell | x |
| 5:00 | 9:00 | 1:00 | 2 Bells | xx |
| 5:30 | 9:30 | 1:30 | 3 Bells | xx x |
| 6:00 | 10:00 | 2:00 | 4 Bells | xx xx |
| 6:30 | 10:30 | 2:30 | 5 Bells | xx xx x |
| 7:00 | 11:00 | 3:00 | 6 Bells | xx xx xx |
| 7:30 | 11:30 | 3:30 | 7 Bells | xx xx xx x |
| 8:00 | 12:00 | 4:00 | 8 Bells | xx xx xx xx |
- Take the clock, pendulum and key carefully out of the carton.
- Carefully remove the protective packaging such as foam rubber and rubber bands, to release hammer and pendulum leader.
- Please wind your clock fully every 7 days for optimum performance (the clock will actually run about 14 days on one winding). To wind the clock hold the pendulum to one side and push key onto the winding square. Turn key clockwise until fully wound (approximately 3 1/2 turns after one week of running).
- Hang the pendulum onto the pendulum leader, located at the front of the movement (see illustration).
- Move pendulum gently to left or right side until pendulum leader is touching the hour shaft. Let the pendulum swing so you can hear an even "tick tock" sound.
- If pendulum should stop, just push it again all the way to the left or right and release it. This may also be necessary after winding up the clock.
- Move the minute hand (long hand) clockwise or counterclockwise to set the clock to the correct time. The clock will strike the bell once on each hour.
- The clock is regulated by turning the regulating nut below the pendulum (see illustration below). When turning the nut please hold pendulum disc so that it does not twist.
- To make the clock run slower - turn the regulating nut to the left.
- To make the clock run faster - turn the regulating nut to the right.
- One turn of the regulating nut changes the clock's rate by approximately 2 minutes per day.

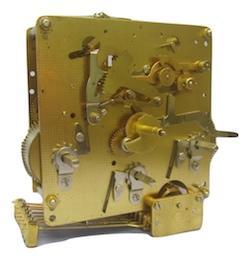
Rockler Hermle Movement Instructions
PARTS LIST
QTY. PART DESCRIPTION
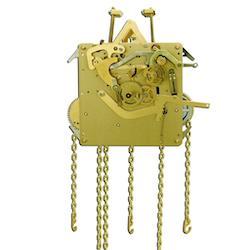
- Movement #451-050 (with chains, hooks, rings and hand nut )
- Weight shells - polished brass (40 x 232mm)
- Weight inserts - lead (4.7 lb.)
- Weight insert - lead (6.6 lb.)
- Pendulum -( Wood stick or Lyra style) depends on order
- Mounting screws & Washers (for seatboard mounting)
- Weight rods, hooks, knobs
- Chime block (back mount.) with mounting screws & washers
- Hands for 8” dial (pair)
- Chime selector angles with set screw
NOTE: HERMLE DOUBLE-CHECKS ALL PARTS PRIOR TO SHIPMENT.
Please read the instructions carefully before beginning to install your movement.
UNPACKING INSTRUCTIONS
- Keep movement wrapped and away from woodworking areas( dust can be harmful)
- Be sure to look through all packing material, not to miss any parts.
- Be careful cuting taped packed parts open.(You do not want to scratch or cut any parts)
MOUNTING MOVEMENT TO SEATBOARD
- Seatboard schematics should be provided with case plans.
- To fasten movement to seatboard you must first slip movement chains through the precut chain slot in seatboard, this will allow the movt. to rest level on the board. Place the movement onto the seatboard parallel to the front edge and center it from side to side. All chains must hang through the center slot of seatboard. Also, check that the pendulum leader does not come in contact with the seatboard after the movement is placed on it.
- Take the two movement mounting screws and washers, screw them in from underneath the seatboard into the bottom movement pillars with threaded holes. (These pillars are located in-between the movement plates at the bottom right & left corners of the movement.
- Make sure both screws are tightened so that the movement is secured to the seatboard and will not slide or tip when moved (finger tight plus one turn, do not over tighten).
MOUNTING DIAL TO MOVEMENT
- With the movement placed inside the clock, slide the selector angle onto the selector arm but do not tighten the set screw yet (angle points forward to protrude through dial slot).
- Slide the moon drive-gear onto the handshaft (with the teeth towards the movement).
- Take dial out of the plastic cover, fit dial onto the movement by inserting dial posts through the four holes in movement plate (holes are located at each corner of front movement plate).
- While holding dial on movement, you will notice that the four dial posts are protruding through the inside of the front plate. At the end of these posts there are holes drilled through them for the brass tapered pins. Press one tapered pin in each hole. (Be sure pin is in tight) This will hold dial in place.
- Align the moon drive-gear ,( you placed it on the handshaft in step 2) so it rides in the middle of the gear on bottom of the dial. Once it is in this position you can tighten the set screw in the moon drive-gear.
- Align the chime-selector angle protruding through the dial at the 3 o’clock position to the center of the slots in the dial and tighten the set screw. (Set screw is located on the back of the chime-selector angle).
- If you have the second hand option on your model, take the second-hand and insert its shaft through the hole of the second-hand dial. Make sure the second-hand does not come in contact with the dial. (not all models have the second hand option)
- Minute and hour hand installation comes after weight installation.
MOUNTING MOVEMENT TO CASE
- Install the movement which is mounted on the seatboard into the case. The handshaft has to be in the center of the case. The dial has to fit in the dial-cutout of the case. Make sure that the handshaft does not come into contact with the glass in the door when it is closed.
- Position the chime rod assembly inside the rear of the case such that the base of the chime block is approximately 1” above the hammers. Secure the seatboard at this time to the 2 mounting blocks inside the case with wood screws (not supplied by us).
- If your case is deeper than 9”, a wood block will have to be added to the back wall of the case to bring the chime block closer to the movement. The hammer wires on the movement must be bent to adjust to the chime block rods.
NOTE: None of the chime rods are to interfere with the pendulum leader or the pendulum itself .
- Mark the position of the four threaded holes onto the back board.
- Remove the chime assembly unscrew movement from seatboard and drill these four holes into the backboard using a 7/32” drill bit.
- Place the four washers onto the four mounting screws and secure the chime assembly to the case.
- Screw movement back onto the seatboard making sure that it is centered again. Also, make sure that the center shaft will not come into contact with the door when it is closed.(Important)
- With the movement secured, bend hammer arms so that the hammers strike each chime rod squarely in the center and rest approximately 1/16” to 1/8” off of the rods(you must do this to get the best sound. Also, do not position hammer arms closer than 1/16" because hammer will double hit the chime rod.) The closer the hammer is to the rod, the louder it will strike, the further away, the softer it will strike. Beyond this, there is no volume adjustment.
- Rotate the chrome chime hammer retainer bars back and away from the chime hammers. Make sure they are as far away as possible from the hammers.
INSTALLATION OF THE PENDULUM
- Unpack pendulum carefully.
- Use gloves to handle the pendulum, thus avoiding fingerprints. Hang the pendulum onto the pendulum hanger hook , located on the back side of the movement.
INSTALLATION OF THE WEIGHTS
- Unpack the three weights also using gloves to avoid fingerprints.
- Using a clean cloth rag or glove to hold weight shells, insert one weight insert into each of the brass weight shells. Some inserts may fit tightly, so some force may be necessary. Be careful not to dent or scratch shells.
- Insert the 6.6 lb. weight into one shell. Insert the 4.7 lb. weights into the other shells, Place an end cap onto each end of all the weights.
- Next slide the weight rod through the entire weight insert and shell so the rod protrudes through the top and bottom of the shell. Then screw one hook on the top and one knob on the bottom of all three shells.
- Take the 6.6 lb. weight and hang it on the right-hand chain (chime side) while making sure that the chain lies hooked on the gear above. Install the other two weights in the same manner. (If you have two heavy weights and one light, then the two heavy weights should be hung on the middle & the right side chain. (This is looking at the clock from the front.)
IMPORTANT: The weights and pendulum MUST be removed before moving your clock. Failure to do so may damage the pendulum, weights, your case or break the door glass.
Every clock has its own unique voice. Mantel clocks, grandfather clocks and wall clocks all differ in tone even when the same melody is played. Even within the same family, there may be significant variations. Most of our product pages for chiming clocks showcase the sound of the chimes. We want our customers to have the experience of listening to the sound of the clock. After all, the chime is part of a clock's "personality" and may be an important factor in the buying decision.
Westminster Chimes, also known as the Cambridge Quarters, from its place of origin, the church of St. Mary the Great in Cambridge, England. People commonly associate the Westminster Chimes with Big Ben at the House of Parliament in London.
Whittington Chimes are also called St. Mary's Chimes. There are four variations of this chime sequence. The tune originated with the bell tower of the church of St. Mary le Bow in London, England. In the 14th century, the chimes became famous through a legend that connects them with Dick Whittington.
St. Michael Chimes originated in the United States. The bells for this chime were originally cast in London for installation in St. Michael’s Church in Charleston, South Carolina.
Ave Maria Chimes are based on Franz Schubert's Ave Maria, which was inspired by the Sir Walter Scott poem "The Lady of the Lake." The composition came into usage as clock chimes in the 1940s.
Bim-Bam is a descriptive term for the two-note chimes which sound only at the half hour and hour. With most clocks, mechanically-driven hammers strike the two tuned chime rods to produce the distinctive tone.
Gong sounds the hours on a bell or gong. In 12-hour striking, used most commonly in striking clocks today, the clock strikes once at 1:00 A.M., twice at 2:00 A.M., continuing in this way up to twelve times at 12:00 P.M., then starts again, striking once at 1:00 P.M., twice at 2:00 P.M., up to twelve times at 12:00 A.M.
Cuckoo Clock entertains everyone with its unmistakable cuckoo call, said to bring luck. Traditionally, with cuckoo clocks, a gong is struck by a mechanical hammer. This adds depth of sound to the cuckoo call. If the hammer is too close to the gong, then the clock might produce a sick-sounding cuckoo.
Most clocks that have a chiming movement, (three winding holes) typically come with the Westminster Chime. However, some clocks have multiple tunes that are selectable. The most common combination on triple-chime clocks is Westminster, St. Michael's, and Whittington. There are variations of each chime so different clocks may play them differently.
Ship Bell Strikes are different from the other clock melodies. Unlike civil clock bells, the strikes of a ship's bell do not accord to the number of the hour. Instead, there are eight bells, one for each half-hour of a four-hour watch. In the age of sailing, watches were timed with a 30-minute hourglass. Bells would be struck every time the glass was turned, and in a pattern of pairs for easier counting, with any odd bells at the end of the sequence.
Here we've gathered a sampling of sounds in one place to make it easy for people to compare and contrast. While these sounds provide a good sense for the different chime melodies, please keep in mind that the clock you end up getting may have a slightly different tone